DIN-Rail and Wall-Mount Bracket Assembly: ztC Edge 100i Systems
Note: When installing the DIN-rail or wall-mount kit on a ztC Edge node, make sure that the surface with the Stratus logo faces up.
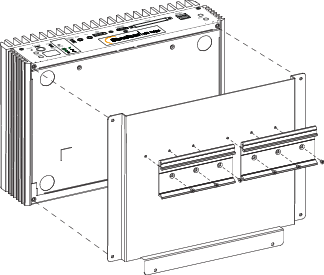
To attach the DIN-rail mount kit:
- Remove the four (two per side) flat-head M3 x 6mm screws located at the bottom of the node.
- Use the four round-head M3 x 6mm screws located in the accessory box to attach the DIN-rail mount plate to the node.
- Use the six flat-head M3 x 6mm screws located in the accessory box to attach the two DIN-rail mount brackets to the DIN-rail mount plate.
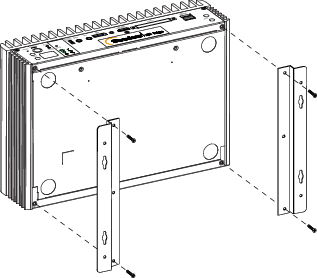
To attach the wall-mount kit:
- Remove the four (two per side) flat-head M3 x 6mm screws located at the bottom of the node.
- Use the four round-head M3 x 6mm screws located in the accessory box to attach the wall-mount brackets to the node.
Note: If you mount the unit on drywall or similar material, use hollow wall anchors compatible with the material to ensure that the unit does not pull away from the wall due to prolonged strain on the cables. Use screws with a minimum diameter of 0.138 in. (3.5 mm), minimum length of 1.5 in. (38.1 mm), and minimum head diameter of 0.216 in. (5.5 mm). Ensure that the screws are compatible with the selected hollow wall anchor.